How to recover deleted files on Windows: Quick fixes that work


Accidentally deleting a file on Windows doesn’t have to mean losing it forever. In most cases, Windows keeps copies you can get back through the Recycle Bin, File History, OneDrive, or its own file system, and most fixes take only a few minutes.
The key is to act quickly and use the right method for how the file was deleted.
This guide covers every option, from one-click restores to tools that work even after you've emptied the Recycle Bin.
Before you start: How to maximize recovery chances
Deleting a file doesn’t immediately erase its data. When Windows removes a file, it marks the storage space as available for reuse, but the actual data usually stays on the drive until something else overwrites it. That gap between deletion and overwriting is your recovery window.
How wide that window is depends on how the file was deleted.
| How it was deleted | What Windows does | Recovery chances | What you should do |
| Delete key or right-click > Delete | Moved to Recycle Bin; stays there until emptied | Very high | Open Recycle Bin and restore |
| Shift + Delete | Bypasses Recycle Bin; space marked as available | Moderate | Stop using the drive; try a backup or Windows File Recovery |
| Recycle Bin emptied | File entry removed; data may remain until overwritten | Moderate to low | Don’t save anything new to the drive; try a backup or recovery tool immediately |
| Deleted from USB or external drive | Often bypasses Recycle Bin immediately | Moderate to low | Unplug the drive and scan it with a recovery tool |
| Drive formatted | File system removed; underlying data often intact | Low | Use Windows File Recovery in extensive mode or a recovery service |
Quick tip: If you simply deleted a file, press Ctrl + Z in File Explorer to undo the deletion instantly. You can also right-click inside the folder where the file was and select Undo Delete. There are various limitations, though: these methods only work if the file was sent to the Recycle Bin, for the most recent action, and they reset if you close the window or restart. However, these are the fastest options when timing is on your side.
Method 1: Restore files from the Recycle Bin
This is the first place to check. When you delete a file using the Delete key or by right-clicking and selecting Delete, Windows moves it to the Recycle Bin instead of removing it permanently. It stays there until you empty the bin or it exceeds the storage limit.
Open the Recycle Bin, right-click on the file you want to recover, and click Restore. To recover multiple files, hold Ctrl while clicking each one, then right-click and choose Restore. Windows will move the file back to its original location.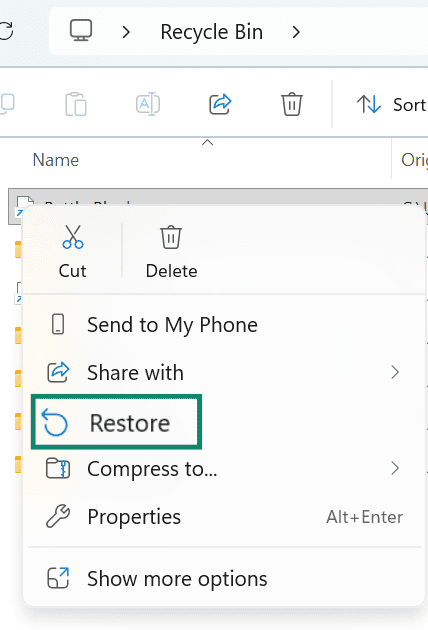
What if the file isn’t there? Some actions bypass the Recycle Bin: deleting with Shift + Delete, deleting files that exceed the Recycle Bin’s size limit, deleting from a USB or external drive, or using a command-line tool. In those cases, move on to the methods below.
Method 2: Recover deleted files using Windows File History
File History is a Windows backup feature that automatically saves copies of your files to an external drive or a network location. If it was set up before the file was deleted, you can restore previous versions of that file, even if it was changed or overwritten.
File History backs up files in your standard user folders (like Documents, Pictures, Videos, Music, and Desktop), as well as in any folders you’ve added to a Windows library.
Note: File History isn’t enabled by default. If you haven’t set it up, there won’t be any backups to restore from. Skip to the setup instructions below if you need to enable it for future protection.
Restore a file using File History
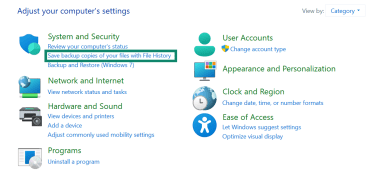
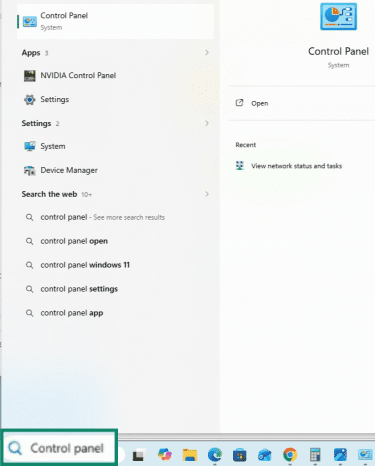
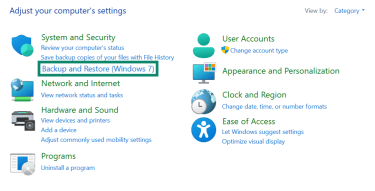
- Type Control Panel in the Search bar and press Enter.
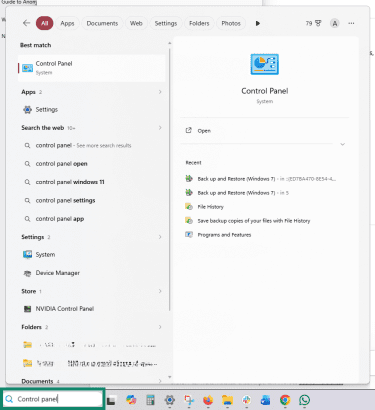
- Under System and Security, click Save backup copies of your files with File History.
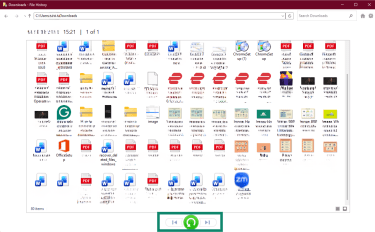
- Click Restore personal files in the left-hand sidebar.

- Use the arrows at the bottom to browse through backup versions by date. Select the file you want to restore and click the green Restore button.
How to enable File History
To use File History, you need an external drive or a network location. Windows can’t back up to the same drive your files are stored on, because a single drive failure would delete both your original files and any backups.
- Connect your external drive.
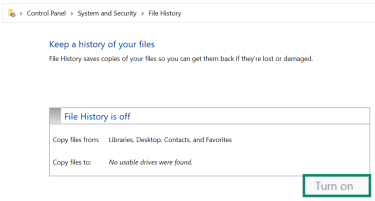
- Type File History in the Windows search bar and press Enter. Click Turn on. Windows will start backing up your files to the drive.
Windows will start backing up your files automatically, once an hour by default. You can change the frequency and folders it monitors under Advanced settings.
Method 3: Restore a previous version of a file or folder
Windows can restore earlier versions of files or folders through the Previous Versions feature. This pulls saved copies from File History or from Volume Shadow Copy Service (VSS) snapshots, which are automatic system snapshots that Windows creates at certain points, such as before updates.
This method only works if either File History or System Protection (which manages restore points and VSS snapshots) was turned on before you deleted the file.
- Open File Explorer and go to the folder where the deleted file was.
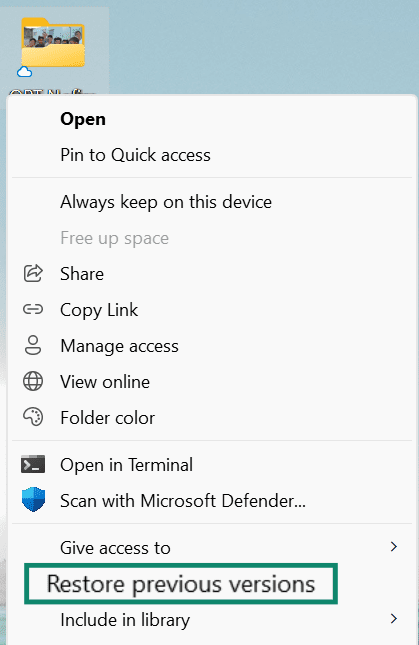
- Right-click the folder. Select Show more options.
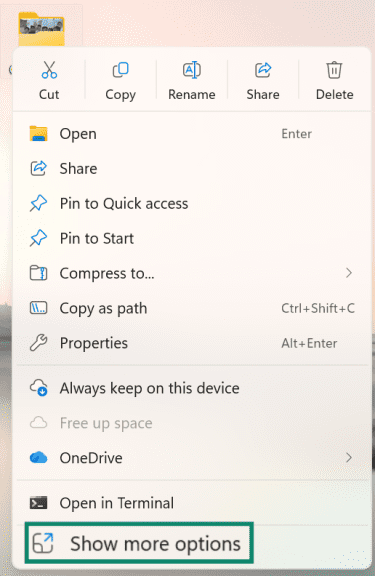
- Click Restore previous versions.
- In the Previous Versions tab, select a version dated before you deleted the file.
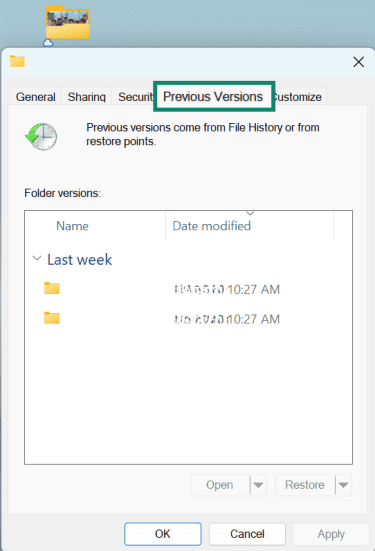
- Click Open to preview the folder’s contents. Drag out the specific file you want to recover, or click Restore to replace the entire current folder with this version.
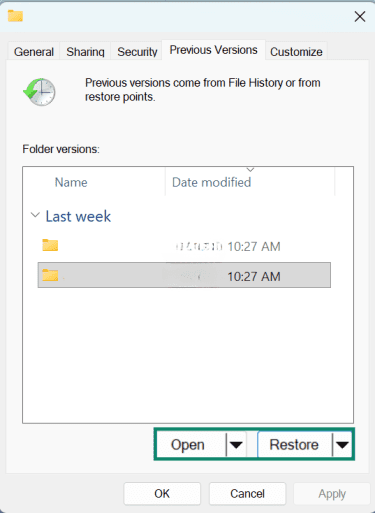
Tip: If you only need one file, always use Open to preview it first. Clicking Restore replaces everything in the folder with the older version, which could overwrite files you still need.
Method 4: Recover deleted files with Windows Backup and Restore (Windows 7)
This legacy tool still works in Windows 10 and 11. It’s a separate tool from File History, and the two serve different purposes.
| Feature | File History | Backup and Restore (Windows 7) |
| What it saves | Multiple versions of personal files | Scheduled backups of files, folders, or a full system image |
| Best for | Recovering a recent version of a changed or deleted file | Restoring files or your entire system from an older backup |
| Recovery approach | Restore individual file versions | Restore files from a backup set or recover the whole system |
Important: Like File History, Backup and Restore only works if you set it up before the file is deleted. If you haven’t configured it yet, you can set it up now to protect files going forward (see the setup note at the end of this section).
- Connect the external drive where the backed-up files are stored.
- Type Control Panel in the Search bar and press Enter.
- Under System and Security, click Backup and Restore (Windows 7).
- Click Select another back-up to restore files from.
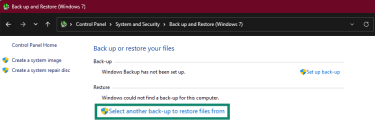
- Select your external drive, choose the files or folders you want, pick a restore location, and click Restore.
To set up Backup and Restore for the first time, follow the steps described above, but in step 4, click Set up back-up and follow the on-screen instructions.
Method 5: Recover files from OneDrive or cloud backup
If you sync files to a cloud backup service such as OneDrive, Google Drive, Dropbox, or iCloud, you may be able to recover them directly from the cloud, even if you’ve deleted them from your computer.
Each service has its own trash folder with its own retention period. Check your provider’s settings to see how it keeps deleted files. For example, OneDrive keeps deleted files for either 30 days (personal accounts) or 93 days (work or school accounts).
Recover a file synced to OneDrive
If you deleted the file from your computer, but it was synced to OneDrive, it may still be there.
- Log into your OneDrive account and click My files in the left sidebar.

- Find the file or folder you want to recover, click the circle next to it to select it, and click Download in the menu bar.

- Save the file to your computer.

Recover a file deleted from OneDrive
If you deleted the file from OneDrive itself, check the OneDrive Recycle Bin.
- Log into your OneDrive account and click Recycle Bin in the left sidebar.

- Select the file you want to recover and click Restore. This moves it back to its original folder in OneDrive.

Method 6: Restore files with Windows File Recovery
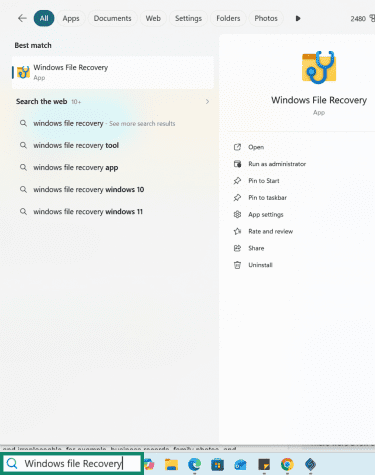
Windows File Recovery is a command-line tool from Microsoft that scans a drive for recoverable files. You can download it for free from the Microsoft Store.
The tool has two modes:
- Regular: Best for recently deleted files.
- Extensive: For older deletions, formatted or corrupted drives, or USB devices.
How to run a recovery
- Type Windows File Recovery in the Search bar and select Run as administrator.
- Use one of the commands below, adjusting the drive letters for your situation. The basic command structure is winfr [source-drive]: [destination-drive]: /[mode] /n [filter], and the source and destination drives must be different. For example, if you’re recovering files from your C: drive, save the recovered files to another drive, such as E.
| Action | Command |
| Recover recently deleted files from a specific folder | winfr C: E: /regular /n UsersYourNameDocuments |
| Recover a specific file type (for example, a Word document) | winfr C: E: /regular /n *.docx |
| Deep scan a formatted or corrupted drive | winfr C: E: /extensive |
| Recover photos from a specific folder | winfr C: E: /extensive /n UsersYourNamePictures*.jpg |
- When prompted, press Y to start the scan. Recovered files are saved to a folder called Recovery_[date and time] on the destination drive.
Scenario-based recovery
Data loss can occur in various ways, so the recovery method depends on how the files were lost.
The Recycle Bin is empty, and there’s no backup
If you emptied the Recycle Bin and don’t have File History, Backup and Restore, or cloud storage set up, your options are limited, but recovery may still be possible.
Use Windows File Recovery as soon as possible and don’t save anything new to the drive, as new data can overwrite the deleted files.
If that doesn’t work, a professional data recovery service may still be able to help, depending on how much of the data has been overwritten.
Files were permanently deleted with Shift + Delete
In this case, the file bypasses the Recycle Bin, but the data usually stays on the drive until something overwrites it. Stop using the drive immediately and try Windows File Recovery in regular mode first.
If you have File History or cloud backups, check those too. Sometimes a backup version exists even when the local file is gone.
Files disappeared after a Windows update or upgrade
Files aren’t usually deleted during a Windows update, but they can seem to vanish if Windows created a temporary user profile during the process.
Check whether you’re signed into the right account: go to Settings > Accounts and look for a message about a temporary profile. If you see one, restart and sign back into your usual account. Your files should reappear.
If they don’t, search your entire computer from File Explorer: press Windows + E, select This PC in the left sidebar, and use the search bar in the top-right corner.
Also, go to the View tab in File Explorer and make sure Hidden items is checked. Windows can mark files as hidden after updates.
You can also run the Windows troubleshooter (search for it in Windows Settings) to fix problems with file search.
Files deleted from a formatted drive
Formatting a drive removes the file system that tracks data, but the underlying files often survive until new data is written over them.
Use Windows File Recovery in extensive mode as soon as possible. The sooner you run it, the better your chances. For critical files, professional recovery services generally have a higher success rate.
Files deleted from a corrupted drive
If Windows shows errors when you try to open a drive or asks you to format it before use, the file system may be damaged. However, the data itself might still be intact.
Before running any repair tools, try to recover the data first. Windows File Recovery can often scan a corrupted drive and extract files even when it won’t open normally.
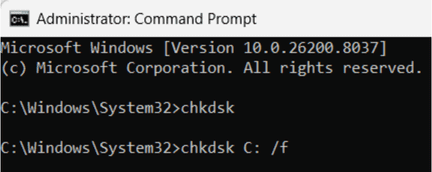
You can also try Windows’ built-in CHKDSK utility to scan for and repair file system errors:
- Type cmd in the Windows search bar and select Run as administrator.
- Type chkdsk C: /f (replace C: with the affected drive letter) and press Enter.
Note: Running repair tools on a failing drive can sometimes cause further damage. If the drive is making unusual sounds, isn’t being detected, or is very slow, recover the data first and repair later.
Files deleted from a USB or external drive
Files deleted from a USB device generally bypass the Windows Recycle Bin and are removed immediately. However, the data usually stays on the drive until something overwrites it. Unplug the device right away and don’t write anything to it.
Connect the USB drive to your computer and use Windows File Recovery in extensive mode to scan it, saving any recovered files to a different drive.
Files lost from a crashed Windows PC
A system crash usually affects the operating system, not the data stored on the drive. Your files may still be perfectly intact.
There are two options worth trying:
- Remove the drive: Connect it to a working computer using a USB-to-SATA adapter or an external enclosure. You should be able to browse the drive and copy your files to another location.
- Boot from a recovery environment: A Windows recovery drive or a bootable USB drive lets you access the file system without needing Windows to start properly.
A recovered file won’t open
This usually means the file was partially overwritten before recovery: some of the data is there, but not all of it. Try opening the file in the application that created it, and make sure that the application is up to date.
If it still won’t open, there are file repair tools you can download for common formats (such as Word documents, PDFs, and photos) that can sometimes reconstruct enough of the file to make it usable.
Windows Search can’t find the files
Windows uses an index to locate files quickly. If it’s outdated or corrupted, files on the drive may not show up in search results. To rebuild it, go to Settings, search for Indexing Options, click Advanced, then click Rebuild. After it finishes, try searching again.
How to prevent file loss in the future
Recovery only works if the data hasn't been overwritten. The best protection is not needing to recover in the first place.
Follow the 3-2-1 backup rule
Keep three copies of your important data: two on different storage types (for example, an internal drive and an external drive) and one stored off-site or in the cloud. If one copy is damaged or lost, the others are still there.
This approach protects against hardware failure, accidental deletion, ransomware, and physical disasters like a fire or flood.
Windows backup tools to set up now
Each of these only takes a few minutes to set up and can save you hours of recovery effort later:
- File History: Connect an external drive, type File History in the search bar, and turn it on. Windows will automatically start backing up your Documents, Pictures, Videos, Music, and Desktop.
- OneDrive folder backup: Go to OneDrive Settings > Sync and backup > Manage backup. Select the folders to sync to the cloud. This gives you an off-site copy of your key files that you can access from any device.
- System Protection (restore points): In Windows Settings, search for Create a restore point, select your main drive, and click Configure to enable it. Windows will create snapshots of system files and settings that can also help restore previous versions of files.
- Backup and Restore: For a full system image backup, open Control Panel and set up Backup and Restore (Windows 7). This is the most comprehensive option; it can restore your entire system, not just individual files.
FAQ: Common questions about recovering deleted files on Windows
Where do deleted files go on Windows?
Deleting with Shift + Delete, or deleting a file that’s too large for the bin, bypasses this step and marks the storage space as available. However, the data usually stays on the drive until something new overwrites it.
Can I recover permanently deleted files on Windows?
Can I recover deleted files on Windows for free?
Can I recover files after emptying the Recycle Bin?
Can I recover deleted files from a USB drive?
How long are deleted files recoverable on Windows?
What's the difference between File History and Backup and Restore?
Take the first step to protect yourself online. Try ExpressVPN risk-free.
Get ExpressVPN