DNS cache: What it is, and how to clear it


Whenever you visit a website, you use the Domain Name System (DNS), also known as the internet’s phonebook, to translate a domain name like expressvpn.com into a computer-friendly IP address that tells your system where to find the website on the internet. To speed up this process, your devices use a temporary database known as DNS cache to store old lookups.
While the DNS cache can improve browsing speed, it can also become corrupted or outdated, leading to connectivity issues or errors on websites. Thankfully, it’s easy to clear the cache and resolve these issues. This guide will explain what a DNS cache is, why it matters, and how you can clear it in case you run into any issues.
Understanding DNS cache
What is DNS cache?
A DNS cache, also known as a DNS resolver cache, is temporary storage that contains DNS records of domain names your device has previously visited. This storage includes records for IPv4 addresses, IPv6 addresses, and other DNS record types. By keeping this information readily available, your device can skip the complete DNS lookup process for sites you've visited recently.
How DNS lookup and caching work
When you visit a website, your computer needs to find the website’s IP address. The DNS query process involves multiple steps and DNS servers. First, your browser checks its own cache. If it’s not found, then your operating system checks its cache. If not found, the OS then queries the DNS resolver provided by your internet service provider (ISP). The DNS resolver checks its own cache, and if it’s not there, it queries the DNS hierarchy until it reaches the domain’s authoritative nameserver.
Once the DNS lookup completes, the resolved IP address is stored in the cache of whatever components performed the lookup, like your browser, your OS, or your DNS resolver.
Think of the local DNS cache as the first checkpoint for all DNS lookups. If the requested domain information exists in this cache, your device won’t need to query external servers, which reduces lookup times.
The role of time to live (TTL) in DNS
Every cached DNS record includes a TTL value that determines how long the record is valid for before expiring and is measured in seconds.
Common TTL values range from 300 seconds (5 minutes) for frequently updated records to 86,400 seconds (24 hours) for stable infrastructure, with some websites even having TTLs of up to 604800 seconds (1 week). TTL in DNS reduces load on authoritative DNS servers (the servers that store the official IP address for a domain) while also ensuring that cached information doesn't become too outdated.
Common DNS cache problems and their causes
Cached DNS records can cause issues when they become outdated or corrupted. If a website changes its IP address but your cache still contains the old address, you'll encounter connection errors. Common DNS cache problems include the following:
- DNS_PROBE_FINISHED_NXDOMAIN: This error means that your device thinks a domain does not exist, as NXDOMAIN means nonexistent domain. It could be a result of the DNS resolver being down or your device having an outdated DNS record.
- DNS server not responding: This error could be caused by a problem on your device or the server. It could be due to outdated DNS records, an unresponsive DNS server, or even a problem with your firewall.
How to clear your DNS cache (flush DNS)
Clearing your DNS cache forces your device to fetch fresh DNS information. This process varies by OS, but the procedure is straightforward in most cases.
Step-by-step instructions
Below are step-by-step instructions on how to clear your DNS cache on Windows, macOS, and Linux.
How to clear DNS cache on Windows
Windows users can clear their DNS cache through the Command Prompt.
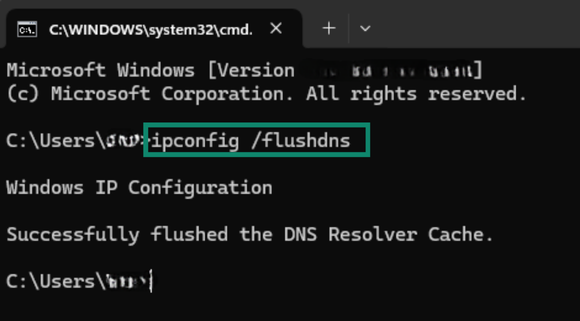
- Open Command Prompt on Windows by pressing Windows + R, typing cmd, and clicking on OK.
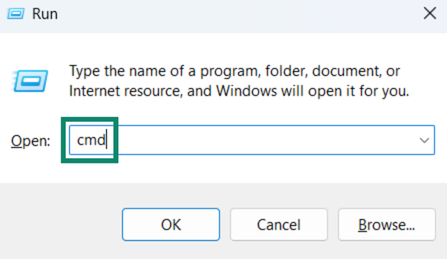
- Type the ipconfig /flushdns command and hit enter on your keyboard to flush the DNS cache.
How to clear DNS cache on macOS
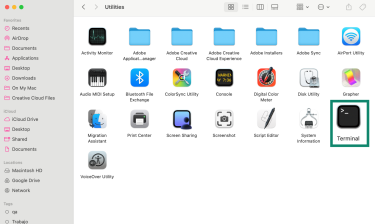
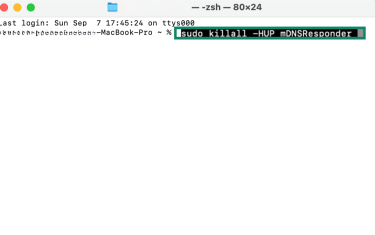
Mac users must use Terminal to flush their DNS cache.
- Access the Utilities folder in your macOS device and double-click Terminal.
- Enter the sudo killall -HUP mDNSResponder command and press enter. You’ll be asked for your password before the cache is cleared.
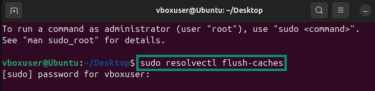
How to clear DNS cache on Linux
Some Linux devices don’t maintain a DNS cache by default, so in some cases, you’ll only need to clear your browser cache. If your system does have a DNS cache enabled, you can use the terminal to clear it. The example below is for Ubuntu 22.04 and higher.
- Right-click anywhere on your desktop and click Open in Terminal.
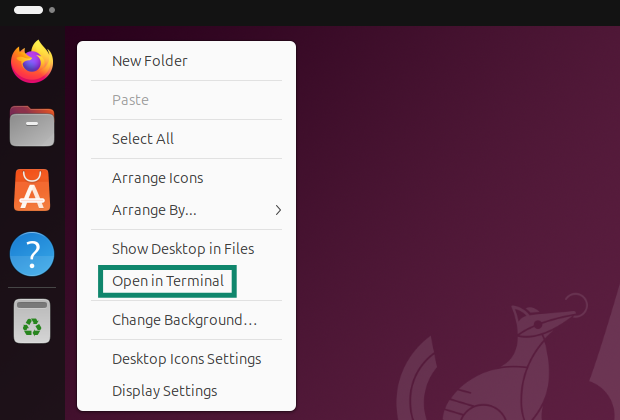
- Enter sudo resolvectl flush-caches and press enter to clear the cache.
How to verify that the DNS cache was cleared
Verifying that your DNS cache is cleared involves a similar process to clearing it. On Windows, you can use the ipconfig /displaydns command to see the content of your DNS resolver cache and verify whether any entries exist.
On Linux, it’s a bit more involved. To verify that your DNS cache clear is working, first query any domain (e.g., dig A example.com) to ensure it’s cached, then check the current cache misses with sudo resolvectl statistics. Flush the cache using sudo resolvectl flush-caches, query the same domain again with dig A example.com, and check the statistics once more with sudo resolvectl statistics. If no other apps or background traffic are active, the “Cache Misses” value should increase.
If you’re a Mac user, you can open the Console app and enter any:mdnsresponder in the search bar to view DNS activity.
Troubleshooting DNS cache clearing issues
If you’re still having issues after following the methods above, there are steps you can take to fully reset your DNS cache and restore proper internet connectivity.
Check the browser and router cache
Sometimes clearing the DNS cache doesn't resolve connectivity problems. If you've flushed your cache but still experience issues, the problem may lie with your browser's internal DNS cache or even your router’s cache.
Modern browsers maintain separate caches independent of your operating system. Chrome users can clear the browser's DNS cache by visiting chrome://net-internals/#dns and clicking on Clear host cache. Other browsers maintain similar internal caches that require separate clearing.
Some routers also maintain their own DNS cache. You can clear this cache by power cycling your router (unplugging the cable for 30 seconds and plugging it again) or resetting the cache from the router’s administrator panel to try and resolve issues that persist after clearing your device's cache.
Fixing DNS performance problems
It’s possible your DNS cache isn’t the source of your connectivity problems. If flushing doesn't improve performance, switching to public DNS servers like Google’s 8.8.8.8 or Cloudflare’s 1.1.1.1 may improve speed and reliability.
If you’re using Windows, verify that the DNS Client service is running by opening the Run command window by pressing Windows + R, typing services.msc, and clicking OK. Then, browse the list of services and ensure the DNS client is active and running.
Your problems may also exist on an ISP level, making it worthwhile to contact your ISP and request a solution. Testing with a different network connection, such as a cellular connection, can also help isolate whether the problem is with your device’s cache or your network in general.
Security risks of an outdated DNS cache
Alongside impacting your browsing experience, having an outdated DNS cache can potentially lead to security issues.
What happens when DNS entries become stale?
Stale DNS entries occur when cached information no longer matches the current DNS records on authoritative servers. The immediate impact is connection failure, as you'll be unable to access the affected websites and will get error messages or timeout errors.
The security concern here is that if a domain's IP address changes due to a security incident, your stale cache might continue directing you to a compromised server. This could be especially dangerous when accessing websites that handle sensitive information.
Understanding DNS cache poisoning (DNS spoofing)
DNS cache poisoning, also known as DNS spoofing, is a cyberattack where threat actors replace legitimate DNS records with fake information. This manipulation redirects users to malicious websites designed to steal credentials, distribute malware, or conduct phishing attacks.
The attack works by exploiting vulnerabilities in the DNS protocol or in how DNS infrastructure is implemented. Attackers send forged DNS responses that appear to come from a trusted DNS server. If these fake responses arrive before legitimate ones, DNS resolvers cache the malicious information.
What is a DNS leak?
A DNS leak is a security flaw where your DNS requests are sent outside your intended secure connection. This can occur if a virtual private network (VPN) unexpectedly disconnects, lacks IPv6 support, or doesn’t properly route all DNS queries through the VPN tunnel. It can also happen due to misconfigured network firewall settings.
Having a DNS leak can expose your browsing activity, even if your traffic is encrypted. Additionally, it can leave you vulnerable to man-in-the-middle (MITM) attacks.
How a VPN protects you from DNS leaks and cache exploits
A reputable VPN service provides multiple layers of protection against DNS security threats. VPNs with built-in DNS leak protection are designed to route all DNS queries through encrypted tunnels.
Top-tier VPN providers also operate their own DNS servers that don't log your queries. This ensures your DNS requests remain private and aren't sold to advertisers or shared with third parties. For instance, ExpressVPN offers its own encrypted DNS for reliable safety against online tracking.
VPN encryption
VPN encryption creates a secure tunnel that encrypts all your internet traffic, including DNS queries, using strong encryption like 256-bit Advanced Encryption Standard (AES) or ChaCha20, both of which have no known vulnerabilities and are extremely difficult to crack.
Best practices for DNS cache management
Maintaining your DNS cache delivers various advantages, like smooth browsing and security improvements.
How often should you clear your DNS cache?
There’s no set schedule for how often you should clear your DNS cache, and manually clearing it is unnecessary in most cases. System reboots, TTL timelines, and built-in DNS resolver cleanup schedules (such as in Windows devices) result in DNS caches that are regularly cleared of expired entries.
The main reason you may need to manually flush your DNS cache is to troubleshoot network issues, such as if a website isn’t loading properly, and the TTL hasn’t reset to provide a fresh DNS entry yet.
Tools and commands for DNS diagnostics
There are various tools and commands available that you can use to check the status of your DNS cache. Online DNS checkers offer convenient testing without command-line tools. For example, ExpressVPN’s DNS leak test lets you verify whether your DNS queries are properly protected.
If you’d like to go more in-depth, command-line tools like nslookup can be used to retrieve information like IP addresses and other DNS records, helping troubleshoot DNS issues by checking if a domain name resolves correctly. The dig command on macOS and Linux also serves a similar purpose.
For even deeper monitoring, network analysis tools like Wireshark can help you capture and analyze DNS traffic. However, this is a more advanced approach that’s typically used by IT professionals to diagnose complex network issues.
FAQs: Common questions about DNS cache
How do I clear my Domain Name System (DNS) cache?
Methods to clear the DNS cache vary by operating system. On Windows, you can run the ipconfig/flushDNS command with the Command Prompt. macOS users can run sudo killall -HUP mDNSResponder in their terminal, while Linux users can enter sudo resolvectl flush-caches in their terminal.
Is it safe to clear the Domain Name System (DNS) cache?
Yes, clearing the DNS cache is completely safe. The process simply removes temporarily stored DNS information from your device's memory. Your device will automatically rebuild the cache as you browse, and no permanent system files are deleted or modified.
The only minor inconvenience is that websites may load slightly slower on the first visit after clearing the cache, as your device must perform fresh DNS lookups to rebuild the cache. However, subsequent visits should be at the regular speed as the cache is rebuilt.
Can clearing the DNS cache speed up my internet?
Clearing the Domain Name System (DNS) cache won’t make your internet inherently faster, but it can help in certain cases. DNS is often used for load balancing, meaning a website may be hosted on multiple servers, and your DNS response points you to one of them. If your cached record happens to direct you to a slow, busy, or temporarily faulty server, clearing the cache forces your device to request fresh DNS information, essentially giving you another chance to be routed to a faster server.
What happens if I don’t clear the Domain Name System (DNS) cache?
In most cases, leaving your DNS cache uncleared isn’t an issue because your operating system manages the cache automatically based on time to live (TTL) values. However, problems can arise in some scenarios, like when a website changes its IP address but your cache still has the old address. Security risks also increase if cached entries become poisoned, as you might continue visiting malicious sites.
Take the first step to protect yourself online. Try ExpressVPN risk-free.
Get ExpressVPN